Appliance & electronics support
Find your model numberAbout our sources
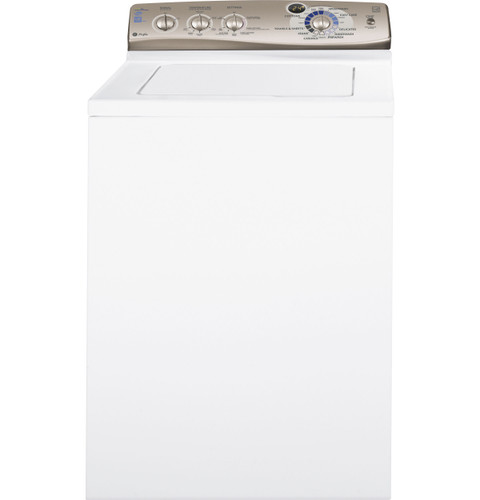
GE Profile PTWN6250MWT washer — manufacturer product image
Photo: PTWN6250MWT. Shared source photo. Photo source
Manufacturer sources

GE Profile PTWN6250MWT

Installation planning

Washing machine · US market · 48 owner topics

GE Profile PTWN6250M / PTWN6250MWT HydroWave Infusor washer

Covers PTWN6250MWT and the manufacturer-listed models in this family.

GE Profile PTWN6250M / PTWN6250MWT HydroWave Infusor washer

Install the PTWN6250M washer on a firm, level floor

GE’s installation sheet covers this washer’s floor, water supply, drain, grounding, leveling and shipping bar. It says not to place the unit on a rug or expose it to weather. Keep the supplied installation instructions because they contain this model’s hose and transit-restraint layout.

Owner checks end at visible connections and leaks; grounding changes, outlet replacement or plumbing alterations belong with qualified tradespeople.

  1. Keep 24 inches at right for shipping-bar removal.
  2. Connect H/C hoses to matching shutoffs; open valves and check for drips.
  3. Secure drain hose at compliant height; level and remove shipping materials.

Prepare location and removal clearance

Choose a firm floor that supports the washer and reduces vibration in spin. The install sheet says concrete is ideal and wood is acceptable if adequately supported. Do not install on a rug or expose it to weather or freezing. Reserve 24 inches at the right side temporarily so the yellow-handled shipping bar can be pulled.

If considering a closet/alcove, check the rear label for approval and use the sheet’s clearances/door ventilation. Keep practical access to both water valves, drain and grounded outlet after pushing the washer into place.

Connect hot and cold hoses

The rear ports are marked H for hot and C for cold. Use sound rubber washers/screens and connect to corresponding shutoffs. Identify the hot household faucet instead of relying on the customary left/right position. Tighten as the sheet specifies, open both faucets and inspect couplings for drips.

The owner manual says hoses are not included, recommends new specified hoses and recommends replacing hoses every five years. If a hose is cracked, bulging or continues leaking, close the faucet and correct it before operating.

Attach and secure the drain hose

The install sheet shows pushing the hose into the rear opening until its clamp is about one-half inch from the cabinet, then fastening it with two screws. Route the free end to standpipe or set tub and secure it with the supplied tie so it cannot jump out while pumping.

The standpipe must have at least a 1 1/2-inch inside diameter and remain open to atmosphere. Discharge height must be at least 30 inches and no more than eight feet above the washer base. If below minimum, use the supplied anti-siphon clip as illustrated.

Level, remove packing and verify

With the large dial pressed to Off, connect to the specified grounded receptacle. The installation sheet levels side-to-side with the front feet, then says to tilt the washer forward about four to six inches and gently lower it to settle the rear feet. Do not work under an unsupported tilted appliance.

Open the lid, remove and discard remaining tub shipping material, then remove the yellow-handled shipping bar and save it. Check hoses and drain for leaks, confirm the washer does not rock, and observe connections during a supervised load.

Two documents give different upper drain limits

The installation sheet gives a discharge range of 30 inches to 8 feet above the washer base. The owner manual’s drainage troubleshooting table instead says the top of the drain outlet should be less than 6 feet above the floor. These are different instructions in the documents GE links to this product. If your drain is near or above 6 feet, have GE or the installer confirm the requirement for the full model and serial before changing the routing; do not use the larger figure as a diagnosis or a guarantee of adequate pumping.

Water leaks at hose coupling.

A washer may be misseated or a connection loose.

Close the household valve, reseat connection/washer and inspect before restarting.

Washer fills and drains simultaneously.

Drain routing may be low or unsecured, allowing siphoning/flow-out.

Recheck 30-inch minimum and anti-siphon instructions.

Washer rocks during spin.

Floor firmness or leveling may be inadequate.

Level on firm flooring; have floor support assessed if it flexes.

Common questions

Can the shipping bar stay in?

No. Installation instructions say to remove it before use and save it for a future move.

What is the drain-height range?

At least 30 inches and no more than eight feet above the washer base.

Specifications & model details

PTWN6250MWT: model-specific checks

Plan with this model’s measurements

For GE Profile PTWN6250MWT, the source gives width 27 in (685.8 mm), height 42 in (1,066.8 mm), depth 25.5 in (647.7 mm). Measure the narrowest doorway, turning space and final opening using those same directions. These are product measurements; add the separately specified hose, ventilation, door/lid, handle and service space. The reported width × depth occupies about 4.78 square feet before those allowances.

Recorded model facts

Model details relevant to this topic

SpecificationRecorded valueEvidence
Approximate Shipping Weight160 lb
Manufacturer
GE — PTWN6250MWT

Exact-model manufacturer resource; specification fields

Exact SKU PTWN6250MWT; manufacturer specification label: Approximate Shipping Weight.

Observed Oct 27, 2026
Height Needed for Lid to Raise 90 Degrees51 in
Manufacturer
GE — PTWN6250MWT

Exact-model manufacturer resource; specification fields

Exact SKU PTWN6250MWT; manufacturer specification label: Height Needed for Lid to Raise 90 Degrees.

Observed Oct 27, 2026
Height with lid raised 90 degrees51 in
Manufacturer
GE Profile PTWN6250M — specs

Exact-model manufacturer resource; Specification 260192, revised 4/11, pp. 1–2; explicit base and finish listing

GE specification 260192, revised 4/11, titles the base PTWN6250M and explicitly lists finish model PTWN6250MWT. Base/retail relationship is documented here; no other suffix or serial range is inferred. Specification 260192, revised 4/11, pp. 1–2; explicit base and finish listing

Observed Oct 27, 2026
Net Weight150 lb
Manufacturer
GE — PTWN6250MWT

Exact-model manufacturer resource; specification fields

Exact SKU PTWN6250MWT; manufacturer specification label: Net Weight.

Observed Oct 27, 2026
Overall depth25 1/2 in
Manufacturer
GE Profile PTWN6250M — specs

Exact-model manufacturer resource; Specification 260192, revised 4/11, pp. 1–2; explicit base and finish listing

GE specification 260192, revised 4/11, titles the base PTWN6250M and explicitly lists finish model PTWN6250MWT. Base/retail relationship is documented here; no other suffix or serial range is inferred. Specification 260192, revised 4/11, pp. 1–2; explicit base and finish listing

Observed Oct 27, 2026
Overall height42 in
Manufacturer
GE Profile PTWN6250M — specs

Exact-model manufacturer resource; Specification 260192, revised 4/11, pp. 1–2; explicit base and finish listing

GE specification 260192, revised 4/11, titles the base PTWN6250M and explicitly lists finish model PTWN6250MWT. Base/retail relationship is documented here; no other suffix or serial range is inferred. Specification 260192, revised 4/11, pp. 1–2; explicit base and finish listing

Observed Oct 27, 2026
Overall width27 in
Manufacturer
GE Profile PTWN6250M — specs

Exact-model manufacturer resource; Specification 260192, revised 4/11, pp. 1–2; explicit base and finish listing

GE specification 260192, revised 4/11, titles the base PTWN6250M and explicitly lists finish model PTWN6250MWT. Base/retail relationship is documented here; no other suffix or serial range is inferred. Specification 260192, revised 4/11, pp. 1–2; explicit base and finish listing

Observed Oct 27, 2026
Branch circuitIndividual grounded circuit; 15 or 20 A breaker or time-delay fuse
Manufacturer
GE Profile PTWN6250M — specs

Exact-model manufacturer resource; Specification 260192, revised 4/11, pp. 1–2; explicit base and finish listing

GE specification 260192, revised 4/11, titles the base PTWN6250M and explicitly lists finish model PTWN6250MWT. Base/retail relationship is documented here; no other suffix or serial range is inferred. Specification 260192, revised 4/11, pp. 1–2; explicit base and finish listing

Observed Oct 27, 2026
Electrical rating120 V, 60 Hz, 10 A
Manufacturer
GE Profile PTWN6250M — specs

Exact-model manufacturer resource; Specification 260192, revised 4/11, pp. 1–2; explicit base and finish listing

GE specification 260192, revised 4/11, titles the base PTWN6250M and explicitly lists finish model PTWN6250MWT. Base/retail relationship is documented here; no other suffix or serial range is inferred. Specification 260192, revised 4/11, pp. 1–2; explicit base and finish listing

Observed Oct 27, 2026
Maximum drain outlet heightNeeds resolution
Manufacturer
GE Profile PTWN6250M — owner

Exact-model manufacturer resource; Owner manual 49-90400-1, 07/06/10; pp. 1, 4–7, 9

GE specification 260192, revised 4/11, titles the base PTWN6250M and explicitly lists finish model PTWN6250MWT. Base/retail relationship is documented here; no other suffix or serial range is inferred. Owner manual 49-90400-1, 07/06/10; pp. 1, 4–7, 9 Document difference: installation p. 1 permits up to 8 ft above base; owner p. 8 says outlet below 6 ft above floor. Confirm with GE for the full model/serial; no single upper limit is resolved.

Observed Oct 27, 2026

Other observations retained:

96 in — GE Profile PTWN6250M — installation; Exact-model manufacturer resource; Manufacturer-linked installation instructions, p. 1; plumbing requirements

Minimum discharge height above washer base30 in
Manufacturer
GE Profile PTWN6250M — installation

Exact-model manufacturer resource; Manufacturer-linked installation instructions, p. 1; plumbing requirements

GE specification 260192, revised 4/11, titles the base PTWN6250M and explicitly lists finish model PTWN6250MWT. Base/retail relationship is documented here; no other suffix or serial range is inferred. Manufacturer-linked installation instructions, p. 1; plumbing requirements

Observed Oct 27, 2026
Minimum standpipe inside diameter1 1/2 in
Manufacturer
GE Profile PTWN6250M — installation

Exact-model manufacturer resource; Manufacturer-linked installation instructions, p. 1; plumbing requirements

GE specification 260192, revised 4/11, titles the base PTWN6250M and explicitly lists finish model PTWN6250MWT. Base/retail relationship is documented here; no other suffix or serial range is inferred. Manufacturer-linked installation instructions, p. 1; plumbing requirements

Observed Oct 27, 2026
More background: Plan a washer installation

Category & symptom guidance

Plan a washer installation

Prepare the location

Choose an indoor location protected from outdoor weather and freezing temperatures, with a firm floor capable of supporting the washer during operation. Leave the model’s specified clearances around it and keep access to the water shutoffs and outlet. A soft, uneven, or flexible floor can contribute to vibration; do not assume leveling feet can correct a weak floor or an unsuitable surface.

Check that doors, cabinets, trim, and nearby appliances leave room for loading and service. Front-load washers need door swing space; top-load washers need lid clearance. If the washer will be stacked or placed on a pedestal, verify that the accessory is approved for that exact model and follow its separate instructions.

Coordinate the delivery and setup

Plan for safe movement into the home and into the final position. Manufacturer instructions may require more than one person for moving or installation. Confirm that packing materials and transport restraints will be handled as directed for the specific product. Restraints differ by design: front-load washers commonly use shipping bolts, while a top-load model may use another stabilizing component. Keep removed transport parts for any future move.

Give the installer access to the shutoff valves, drain, and grounded outlet. Clear the route and floor, and identify any concern such as a tight turn, steps, elevated platform, or long hose route in advance. Do not attempt internal adjustment or service work to make the washer install.

Confirm water and drain arrangements

Check the installation guide for the required hot and cold supplies, hose type, pressure limits, and drain arrangement. Use new hoses when the manufacturer directs; route them without kinks, stretching, or pinching. Follow the guide for hose seals, secure connections, and leak checks. A top-load HE washer may use automatic sensing, while a conventional-fill machine may behave differently; low visible water is not by itself proof of an installation fault.

The drain must be securely routed and meet the exact model’s height, distance, and air-gap or standpipe instructions. A loose hose can flood a room; a poorly arranged drain may siphon or prevent proper draining. If the home’s plumbing does not match the guide, ask a plumber or qualified installer to resolve it before operating the washer.

Level and check before laundry

The washer should sit firmly without rocking, with its feet adjusted according to the manufacturer’s instructions. On supported models, a level and gentle push test can reveal movement. Check that hoses are not trapped behind the cabinet and that the machine does not contact walls or cabinetry in a way that could transmit vibration.

After connections and setup are complete, use the installation guide’s initial check or test procedure. Observe that water enters, the machine remains stable, and water drains without leaks. The test load and controls vary by exact product; follow that model’s directions rather than copying a procedure from another washer. If there is a leak, unusual movement, or a connection concern, stop and have the installation corrected before regular use.

What to do with what you find

The washer rocks on a firm floor after the feet are adjusted per its manual.

The appliance may not be level or the floor may flex.

Recheck the feet and floor; ask an installer to assess persistent movement.

A hose connection leaks or the drain hose shifts during the initial check.

The hookup is not ready for normal operation and could cause water damage.

Stop the check and have the connection secured or repaired.

Have these details ready

  • Exact installation instructions
  • Confirmed outlet, shutoffs, drain, floor, and clearances

Common questions

Can I install a washer on any floor if I level it?

No. The floor must meet the exact model’s support and surface requirements; leveling cannot correct a weak or unsuitable floor.

Is the same transport restraint used on all washers?

No. Restraints vary by product design. Follow the exact installation guide and retain removed parts for future moves.

General background sources

These sources support the shared guide. Exact model specifications and matched family procedures have their own sources above.

  1. media.us.lg.com/m/6d5d734b0871fbdf/original/WM4000_Owners-Manual.pdf
  2. images.salsify.com/image/upload/s--dBhUJ9s5--/3f58f84eaa9d207a6fdadfa3a955c70b28005ee2.pdf

Owner guidance by Specs & Parts, drafted with GPT-6 Luna. Sources and scope.

Sources for PTWN6250MWT

GE — PTWN6250MWT Observed Oct 27, 2026
GE Profile PTWN6250M — owner Observed Oct 27, 2026
GE Profile PTWN6250M — specs Observed Oct 27, 2026
Suggest a correction