What is recorded for SPLK30N01A
GE SPLK30N01A — Weights Dimensions Overall Width: 2.88 in; Weights Dimensions Overall Height: 0.62 in; Weights Dimensions Overall Depth: 2.88 in.
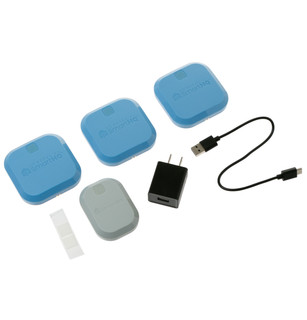
GE SPLK30N01A
Clothes dryer · US market · 44 owner topics
Specifications for SPLK30N01A with owner checks for this product design. Use the matching manual for control sequences and replacement parts.
Specifications & model details
GE SPLK30N01A — Weights Dimensions Overall Width: 2.88 in; Weights Dimensions Overall Height: 0.62 in; Weights Dimensions Overall Depth: 2.88 in.
For GE SPLK30N01A, start with weights dimensions overall width 2.88 in, weights dimensions overall height 0.62 in, weights dimensions overall depth 2.88 in. Preserve those labels when comparing an opening or delivery route. Any handle/hinge allowances, clearances and adjustment ranges that the source does not establish remain additional checks.
Prepare the location by confirming dryer type, utilities, exhaust or condensation handling, clearances, delivery access, and any model-specific accessories.
Category & symptom guidance
Before delivery, establish the dryer’s exact model and whether it is gas or electric. Then compare its installation instructions with the utilities actually present: electrical supply, gas connection where applicable, and the exhaust or condensate arrangement required by the design. A similar cabinet or product-family name does not establish that the connections match.
Dryers may be vented, condenser, or heat-pump designs. A vented unit sends moist air through an exhaust duct; condenser and heat-pump units manage moisture differently and may need a drain or collection arrangement specified by their instructions. Do not plan a new unit around an existing vent opening until the selected dryer type is known.
For a vented dryer, inspect where the duct begins, where it exits outdoors, and whether the route is accessible for cleaning. Confirm the exact model’s permitted duct material, diameter, length, bends, and outlet requirements in its installation guide. Keep the route as direct as the instructions allow and avoid a plan that leaves the connector crushed when the dryer is moved into place.
Some models permit more than one exhaust direction, often with a specific kit. Verify kit compatibility and the resulting spacing before cutting or altering cabinetry. Do not discharge dryer exhaust into a wall, attic, crawlspace, or room. If the existing route is damaged, obstructed, or ends indoors, arrange correction before normal use.
An electric dryer needs the supply and cord arrangement specified for its exact model and jurisdiction. A gas dryer also needs the correct electrical supply, plus a suitable gas connection; its small electrical rating does not eliminate the fuel requirement. Do not adapt a plug, change wiring, or connect gas based on a family brochure. Confirm the site and installation plan with the installer before the appliance arrives.
If a gas model is being converted for a different fuel, verify whether the manufacturer lists a conversion procedure and the exact kit for that model. A kit listed for one family is not universal, and conversion is not an owner improvisation. Make sure the installer knows the fuel available and the model code before work begins.
Measure the delivery route and final location, including door swing, overhead space, wall projections, and room for utility connections. Remove loose items from the route and identify any fragile flooring or narrow turn before delivery. Tell the retailer if the dryer will be stacked, placed on a pedestal, or routed through a tight opening so the delivery plan can account for the configuration.
For a closet, follow the exact model’s opening and ventilation requirements. Some manufacturer instructions specify upper and lower air openings; do not substitute a closed door or assume a louvered panel meets the area requirement without checking. Keep access for lint-filter removal and future service in the layout.
After placement, the installer should verify leveling, stable footing, utility connections, exhaust attachment for vented designs, and that no cord or duct is pinched. Review the owner instructions for first-use checks and controls. If the model has an installation-check feature, use it only as directed in that model’s manual; a feature described on another model’s sheet is not evidence yours includes it.
For condenser or heat-pump designs, confirm that the condensate container or drain is set up as instructed and that filters and heat-exchanger access remain clear. Do not apply vented-dryer airflow assumptions to these machines. Keep the completed installation information and any conversion or accessory details with the appliance record.
The site is prepared for the selected design and fuel type.
The appliance should not be put into routine service under the current plan.
Only if the selected dryer is vented and the route meets its instructions, is intact, and terminates outdoors.
Yes. It needs the electrical supply specified for that model as well as its gas connection.
These sources support the shared guide. Exact model specifications and matched family procedures have their own sources above.
Owner guidance by Specs & Parts, drafted with GPT-6 Luna. Sources and scope.
Recorded model facts
| Specification | Recorded value | Evidence |
|---|---|---|
| Weights Dimensions Overall Depth | 2.88 in | ManufacturerGE Appliances and LG current manufacturer product records Exact primary manufacturer SKU SPLK30N01A; https://www.geappliances.com/appliance/UNIVERSAL-3-1-SMARTHQ-LEAK-DETECT-KIT-SPLK30N01A Manufacturer storefront primary SKU SPLK30N01A; exact source field: spec_weights_dimensions_overall_depth Primary source: https://www.geappliances.com/appliance/UNIVERSAL-3-1-SMARTHQ-LEAK-DETECT-KIT-SPLK30N01A Observed Oct 30, 2026 |
| Weights Dimensions Overall Height | 0.62 in | ManufacturerGE Appliances and LG current manufacturer product records Exact primary manufacturer SKU SPLK30N01A; https://www.geappliances.com/appliance/UNIVERSAL-3-1-SMARTHQ-LEAK-DETECT-KIT-SPLK30N01A Manufacturer storefront primary SKU SPLK30N01A; exact source field: spec_weights_dimensions_overall_height Primary source: https://www.geappliances.com/appliance/UNIVERSAL-3-1-SMARTHQ-LEAK-DETECT-KIT-SPLK30N01A Observed Oct 30, 2026 |
| Weights Dimensions Overall Width | 2.88 in | ManufacturerGE Appliances and LG current manufacturer product records Exact primary manufacturer SKU SPLK30N01A; https://www.geappliances.com/appliance/UNIVERSAL-3-1-SMARTHQ-LEAK-DETECT-KIT-SPLK30N01A Manufacturer storefront primary SKU SPLK30N01A; exact source field: spec_weights_dimensions_overall_width Primary source: https://www.geappliances.com/appliance/UNIVERSAL-3-1-SMARTHQ-LEAK-DETECT-KIT-SPLK30N01A Observed Oct 30, 2026 |