Appliance & electronics support
Find your model numberAbout our sources
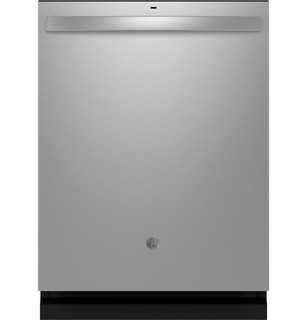
GE GDT650SYVFS product photo
Photo: GDT650SYVFS. Photo source
Manufacturer sources

GE GDT650SYVFS

Not drying well

Dishwasher · US market · 50 owner topics

GE GDT650 dishwasher manual family

Covers GDT650SYVFS and the manufacturer-listed models in this family.

GE GDT650 dishwasher manual family

GDT650SYVFS: diagnose wash coverage by rack, filter, and selected zone

This note is scoped to GDT650SYVFS, whose GE product page lists a Piranha hard-food disposer, four bottle jets, a third rack, selectable wash zones, and Dry Boost. Use these features as loading and wash-result clues, not as proof that another GDT650 suffix has identical rack equipment.

When dishes emerge dirty, identify which rack and which surfaces failed. A whole-load film, one blocked bowl, and residue inside a bottle are different patterns. Note cycle, wash zone, detergent, and whether the load included tall containers; then check spray access and the filter before assuming a pump fault.

Load for spray access rather than visual fullness

Place bowls and plates so they do not nest tightly, and keep large pieces from shielding neighboring surfaces. GE’s wash-zone description says upper-only operation uses the tub-ceiling/hub spray and middle arm; lower-only uses the middle and lower arms. If a zone is selected, the unused rack is not being washed. Check whether the dirty dishes were in the active zone before assessing the cycle.

For GDT650SYVFS, the upper rack has bottle jets and clips intended to direct water into narrow containers. Secure a compatible container over the jet, open end down as directed, and verify that its height clears the rack. GE notes that bottle fit depends on height, thickness, and placement. Do not expect a bottle jet to clean an item that cannot sit over its nozzle.

Use the bottle option for the right shape of container

The bottle jets are four tines with multiple outlets, and GE says selecting the Bottle Wash option can add wash time. The option helps target narrow openings such as bottles or travel mugs; it does not turn the rack into a general extra spray arm. Remove only the clips that the manual identifies as removable. GE does not recommend removing the bottle jets themselves.

If the inside of a bottle remains dirty, check that it is held securely and that the opening faces the jet. If glasses nearby are dirty instead, inspect general loading and spray-arm clearance. The two observations point to different fixes. Any bottle taller than the available gap should go elsewhere rather than being forced against the upper rack.

Check filters and debris when wash quality drops across the load

GE’s product material describes a Piranha disposer, but the owner still needs to maintain the filtration parts identified in the manual. Remove and inspect only the removable filter assembly and follow the exact cleaning steps. GE’s Bottle Wash guidance says wash water passes through fine filtration before reaching the jets and recommends frequent filter cleaning; the manual sets the schedule for your exact unit.

Use a soft brush and water for residue if the manual permits. Do not use a wire brush, pry into the pump, or run the dishwasher without filters properly seated. A label, seed, or broken glass near the filter can obstruct flow; if sharp debris is present, use caution and do not reach blindly into the sump.

Separate detergent and water temperature from blocked spray

If all racks have a greasy film, record detergent type and amount, selected cycle, and whether the sink’s hot water had been running before the cycle. A soil-wide result differs from clean dishes on most racks with a blocked corner. GE’s product page lists AutoSense and other cycles, but use the button labels and the owner manual for the exact model rather than assuming every suffix has each option.

Scrape large food pieces, then load; GE describes the unit as a no-pre-rinse design. Avoid adding detergent into the tub in addition to the dispenser. If residue appears only when a wash zone is chosen, verify that the selected zone includes the affected rack.

Use Dry Boost as a drying aid, not a wash correction

GE lists Dry Boost on GDT650SYVFS and describes better drying for hard-to-dry plastic items than standard heated dry. Dry Boost addresses moisture after washing; it does not correct a blocked spray arm, a dirty filter, or a load placed in the inactive zone. Separate “dishes dirty” from “dishes clean but wet” before changing options.

Plastics may retain droplets because they do not hold heat like ceramic or metal. Load them so water can drain and choose the documented drying option if needed. If everything is wet, review cycle and drying settings. If only one rack is wet, revisit loading and whether the chosen zone or option applied.

When to stop owner checks and seek service

Arrange service if the cycle repeatedly fails to circulate water, a leak reaches the floor, the filter cannot be seated, a control displays a persistent fault, or the pump makes a harsh sound after visible loading issues are removed. Give service the complete code, selected cycle and wash zone, rack with poor results, filter condition, and whether water remains at the end.

Do not remove the dishwasher’s toe panel, handle wiring, bypass a door switch, or pull the built-in appliance out to inspect plumbing. The owner checks here are loading, removable filter care, cycle selection, and recording results. An installer or qualified technician handles concealed hose and electrical diagnosis.

Specifications & model details

GDT650SYVFS: model-specific checks

Start with the source identity

GE GDT650SYVFS is the exact code in this catalog record. This topic should be evaluated for that code and dishwashers category. The original source record is linked below; unrecorded settings, dates and compatibility remain unknown.

Recorded model facts

Model details relevant to this topic

SpecificationRecorded valueEvidence
Additional ProtectionActive Flood Protect
Manufacturer
GE — GDT650SYVFS

Exact-model manufacturer resource; specification fields

Exact SKU GDT650SYVFS; manufacturer specification label: Additional Protection.

Observed Oct 26, 2026
Appearance Color AppearanceFingerprint Resistant Stainless
Manufacturer
GE Appliances and LG current manufacturer product records

Exact primary manufacturer SKU GDT650SYVFS; https://www.geappliances.com/appliance/GE-ENERGY-STAR-Fingerprint-Resistant-Top-Control-with-Stainless-Steel-Interior-Dishwasher-with-Sanitize-Cycle-GDT650SYVFS

Manufacturer storefront primary SKU GDT650SYVFS; exact source field: spec_appearance_color_appearance Primary source: https://www.geappliances.com/appliance/GE-ENERGY-STAR-Fingerprint-Resistant-Top-Control-with-Stainless-Steel-Interior-Dishwasher-with-Sanitize-Cycle-GDT650SYVFS

Observed Oct 30, 2026
Appearance HandleRounded Handle
Manufacturer
GE Appliances and LG current manufacturer product records

Exact primary manufacturer SKU GDT650SYVFS; https://www.geappliances.com/appliance/GE-ENERGY-STAR-Fingerprint-Resistant-Top-Control-with-Stainless-Steel-Interior-Dishwasher-with-Sanitize-Cycle-GDT650SYVFS

Manufacturer storefront primary SKU GDT650SYVFS; exact source field: spec_appearance_handle Primary source: https://www.geappliances.com/appliance/GE-ENERGY-STAR-Fingerprint-Resistant-Top-Control-with-Stainless-Steel-Interior-Dishwasher-with-Sanitize-Cycle-GDT650SYVFS

Observed Oct 30, 2026
Control Type_1Top Controls
Manufacturer
GE — GDT650SYVFS

Exact-model manufacturer resource; specification fields

Exact SKU GDT650SYVFS; manufacturer specification label: Control Type_1.

Observed Oct 26, 2026
Control Type_28 Touchpads
Manufacturer
GE — GDT650SYVFS

Exact-model manufacturer resource; specification fields

Exact SKU GDT650SYVFS; manufacturer specification label: Control Type_2.

Observed Oct 26, 2026
Control Type_3Cap Touch Controls
Manufacturer
GE — GDT650SYVFS

Exact-model manufacturer resource; specification fields

Exact SKU GDT650SYVFS; manufacturer specification label: Control Type_3.

Observed Oct 26, 2026
Cutlery TrayOne piece removable 3rd rack
Manufacturer
GE — GDT650SYVFS

Exact-model manufacturer resource; specification fields

Exact SKU GDT650SYVFS; manufacturer specification label: Cutlery Tray.

Observed Oct 26, 2026
Dishwasher Control Features_13 Digit Display Cycle Countdown with Bi-Color LED Status Light on door
Manufacturer
GE — GDT650SYVFS

Exact-model manufacturer resource; specification fields

Exact SKU GDT650SYVFS; manufacturer specification label: Dishwasher Control Features_1.

Observed Oct 26, 2026
Dishwasher Control Features_21 "Clean" Light, 1 "Sanitized" Light Cycle Progress Indicators
Manufacturer
GE — GDT650SYVFS

Exact-model manufacturer resource; specification fields

Exact SKU GDT650SYVFS; manufacturer specification label: Dishwasher Control Features_2.

Observed Oct 26, 2026
Dishwasher Control Features_3Last Cycle Memory
Manufacturer
GE — GDT650SYVFS

Exact-model manufacturer resource; specification fields

Exact SKU GDT650SYVFS; manufacturer specification label: Dishwasher Control Features_3.

Observed Oct 26, 2026
Dishwasher Control Features_4Audible End-of-Cycle Signal
Manufacturer
GE — GDT650SYVFS

Exact-model manufacturer resource; specification fields

Exact SKU GDT650SYVFS; manufacturer specification label: Dishwasher Control Features_4.

Observed Oct 26, 2026
Dishwasher Control Features_5Control Lock with 1 Light
Manufacturer
GE — GDT650SYVFS

Exact-model manufacturer resource; specification fields

Exact SKU GDT650SYVFS; manufacturer specification label: Dishwasher Control Features_5.

Observed Oct 26, 2026
More background: Not drying

Category & symptom guidance

Not drying

Set expectations for the drying design

Dishwashers dry in different ways. Some use a heated final stage; others rely more on heat retained in dishes, rinse aid, airflow, or an automatically opened door. Plastics cool quickly and often retain droplets even when plates and glassware dry well. First compare materials: if only plastic items are wet, the machine may be behaving differently from a heated-dry expectation rather than failing.

Identify the drying approach from the exact model’s owner guidance or product information. Do not assume a feature such as auto-open, fan drying, or a hidden heater exists because another model in the same brand has it.

  1. Compare plastic, ceramic, glass, and metal items separately.
  2. Check the model’s stated drying method and available options.
  3. Note whether moisture is on dishes only or escaping onto cabinetry or floor.

Improve load drainage

Arrange cups, bowls, and concave items at an angle so water can run off rather than pool. Avoid nesting spoons, and leave space between items that touch. Tall pans can shield neighboring dishes from final-rinse heat and airflow. Ensure no item blocks a vent or fan outlet if the exact model identifies one; do not insert objects into vents.

Lightweight plastics should be secured in the position recommended for that machine so they do not flip and collect water. Rack layouts and heater placement vary, so use the owner loading diagram rather than moving plastics to a presumed safe zone. A repeatable improvement after changing one rack arrangement points toward drainage or shielding rather than a failed drying component.

  1. Tilt bowls and cups to shed water and separate nested flatware.
  2. Keep large cookware from shielding smaller items.
  3. Load plastics only in positions allowed by the exact model instructions.

Use rinse aid and drying options thoughtfully

Rinse aid helps water sheet from dish surfaces, reducing droplets and spotting on many machines that use a rinse-aid dispenser. Check its level and refill only with a product intended for dishwashers, following the dispenser directions. A rinse aid change is a useful single-variable trial; do not increase detergent and rinse aid together because the result will be hard to interpret.

Review whether the chosen cycle includes heated or enhanced drying and whether an energy-saving setting disables it. The GE manual describes Dry Boost options on covered models, including model-specific changes to heat, fan operation, and cycle duration. It also describes opening the door after a short cycle for a flash-dry result. Those details do not transfer to other machines, so follow the feature names and instructions printed for yours.

  1. Check and refill rinse aid only if the machine is designed for it.
  2. Compare the same load with the documented drying option enabled.
  3. Change one setting at a time and note the resulting cycle duration and dryness.

Open the door only as directed

Some condensation-drying machines benefit from opening the door after completion so humid air can escape; others manage airflow with a fan or automatic door opening. Follow the exact model’s instruction about whether and when to open it. Opening during an active cycle can interrupt operation, release hot vapor, or interfere with an automatic feature.

If the machine has an auto-open option, check whether it is selected and whether the door has room to open without hitting cabinetry or nearby objects. Do not disable a feature by wedging the door or adding hardware. If the door does not open as expected, document the cycle and setting before seeking support; the feature may be optional or absent on your variant.

  1. Use only the post-cycle door procedure documented for the exact model.
  2. Check clearance around any documented automatic-opening feature.
  3. Record whether the door opened and which drying setting was used.

Separate ordinary moisture from a drying fault

A damp tub after a condensation-based cycle can be expected; water pooled on many flat surfaces, a cold wash result, or a sudden decline across all dish types is more significant. Check whether the cycle completed and whether a selected option was cancelled or the door opened early. For a GE Sanitized indicator, the cited manual says interruption or insufficient incoming water temperature can prevent the indicator; that does not by itself establish a drying failure.

If all materials remain wet despite correct loading, rinse aid, and the model’s strongest documented drying setting, record the cycle result and any error light. Repeated failure, unusual heat, burning odor, or damage to plastics calls for stopping use and arranging diagnosis rather than experimenting with higher settings.

  1. Confirm the cycle completed and note any interruption or displayed warning.
  2. Compare dryness across materials and identify whether pooling is localized.
  3. Stop if abnormal heat, odor, or repeated cycle failure occurs.

What to do with what you find

Plastics are wet while glass and ceramic are mostly dry, and there is no floor moisture.

Material and drying design may explain the result.

Improve item angle and use documented rinse-aid or drying options.

All dish types stay wet across completed cycles despite correct loading and settings.

A drying or heating system issue is possible.

Record the cycle and indicators, then request model-specific diagnosis.

Have these details ready

  • Dryness by material and rack position, cycle/options, and completion status.
  • Whether rinse aid is used, door behavior, and any warning lights or floor moisture.

Common questions

Should every dishwasher leave plastics completely dry?

No. Plastics retain heat poorly and may remain damp, particularly in condensation-based designs.

Can I use another model’s drying button sequence?

No. Feature names, control sequences, and drying hardware vary. Use only the exact model’s documented controls.

General background sources

These sources support the shared guide. Exact model specifications and matched family procedures have their own sources above.

  1. www.bosch-home.com/us/owner-support/get-support/support-selfhelp-dishwasher-not-drying
  2. images.salsify.com/image/upload/s---cICc_Tn--/5fb2828e0d05a23804bd46dc2e7fdb4e1117ef28.pdf
  3. products.geappliances.com/appliance/gea-specs/GDT650SYVFS/support

Owner guidance by Specs & Parts, drafted with GPT-6 Luna. Sources and scope.

Sources for GDT650SYVFS

GE GDT650 owner’s manual Observed Oct 27, 2026
GE — GDT650SYVFS Observed Oct 26, 2026
Suggest a correction