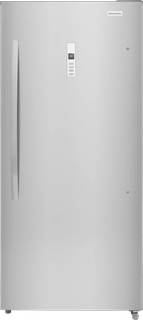
Guidance for Frigidaire freezers. Check the feature and control descriptions against your model.
Specifications & model details
FFUV2136AV: model-specific checks
Choose the recorded defrost branch
Frigidaire FFUV2136AV is listed with Automatic defrost. Use the branch for the listed defrost system. Note whether frost is confined to a door edge, covers stored packages, or returns on an interior surface. Door closure, moisture entry and a defrost-system problem produce different patterns.
Frigidaire FFUV2136AV is recorded as upright. Check the door swing, shelf or drawer seating, and packages projecting into the seal. For uneven cooling, keep the source-listed defrost design in view: airflow checks apply to a fan-cooled layout, while a manual-defrost layout has its own unloading and defrost procedure.
Set up a freezer using its exact installation instructions: confirm fit and ventilation, level it, use the specified electrical supply, then allow it to cool and verify temperature before loading food.
Owner guide: First use & setup
Category & symptom guidance
First use & setup
4 minute read · Shared guidance for freezers
Choose and measure the installation spot
Check the model’s installation sheet before choosing a location. Measure the space and route, including doorway turns, and leave the stated ventilation clearance around the cabinet. The clearance depends on design and model. For example, the Danby DUFM085A2BSLDD upright guide specifies 4 inches at the rear, 8 inches at the sides, and 12 inches above for that model only. Do not treat those figures as a standard for other upright or chest freezers.
Allow enough room for the intended access: an upright door must open and clear nearby walls, while a chest lid needs overhead space and room to remove baskets. A firm, level floor helps the door or lid seal as intended. Keep the location dry and within the ambient conditions specified by the manufacturer.
Measure the appliance, route, and clearances from the exact manual.
Check door swing or lid opening against walls and cabinets.
Choose a firm location that meets the manual’s environmental limits.
Level and inspect the appliance
Position the freezer without blocking airflow openings. If leveling feet are provided, adjust them as the manual describes and check that the cabinet stands steadily. Inspect the power cord and plug for visible damage before connection. Remove packaging, tape, and shipping materials from the interior and door seal, and install shelves or baskets in the positions shown in the manual.
If the door is reversible, use the model’s door-reversal instructions or arrange qualified help; hinge locations and steps vary. Confirm the gasket contacts evenly around the opening. Do not force a hinge or modify the seal to correct a poor fit.
Remove packing materials and fit interior parts as illustrated.
Adjust only the provided leveling feet.
Check the cord, plug, and seal for visible damage before use.
Connect power safely
Use the electrical circuit and grounded outlet specified on the freezer’s rating label and in its manual. Avoid extension cords unless the manufacturer expressly permits one. Keep the plug accessible and do not use a cord with damaged insulation or loose connections. If the outlet or household wiring appears damaged, have an electrician address it before operating the freezer.
Never remove grounding prongs or open electrical panels as part of setup. A freezer’s OFF control may stop cooling without disconnecting every circuit; unplug it when the manual says to unplug for cleaning or defrosting. Installation does not require opening the sealed refrigerant system.
Compare the rating label with the available outlet and circuit.
Plug directly into a suitable grounded outlet unless the manual states otherwise.
Stop and get qualified electrical help if the supply appears unsafe.
Start cooling and verify temperature
Follow the manual for first startup and any wait required after delivery or transport. The Danby DCF035A6WM, DCF050A6WM, DCF070A6WM, and DCF100A6WM family’s three-to-five-minute wait applies to restarting after power interruption, not as a universal setup interval. Allow the freezer to cool before adding a large load, using the timing stated in the exact manual.
A numbered dial is not a thermometer. GE guidance explains that numbered controls change compressor run time and do not correspond to exact degrees. Use a freezer thermometer between packages and allow its reading to settle, following the thermometer and manufacturer’s instructions. For food storage, FoodSafety.gov identifies 0°F or below as the freezer target. Food safety decisions rely on temperature and exposure, not merely on whether the appliance sounds like it is running.
Follow any model-specific post-delivery wait and startup sequence.
Place a thermometer in the compartment and verify it reaches 0°F or below.
Load food in a way that preserves airflow and avoids overloading.
Organize, clean, and maintain the new freezer
Wipe the interior using the cleaner and method allowed by the exact manual, then dry it before loading. Keep the gasket and the surface it contacts clean so the seal can close fully. Place food so it does not block the door or lid from closing, and avoid putting warm food into a freezer if the manual advises against it.
Identify the defrost design at setup. Manual-defrost models need periodic frost removal according to their instructions; frost-free models use an automatic defrost system and should not be treated as if they have a user drain routine. There is no universal defrost interval. Note where the model’s manual is stored, and keep the model number accessible for future parts or service lookup.
Clean and dry the interior and gasket using approved materials.
Confirm the door or lid closes fully after arranging baskets and food.
Save the manual and note whether the design is manual-defrost or frost-free.
General background sources
These sources support the shared guide. Exact model specifications and matched family procedures have their own sources above.