Appliance & electronics support
Find your model numberAbout our sources
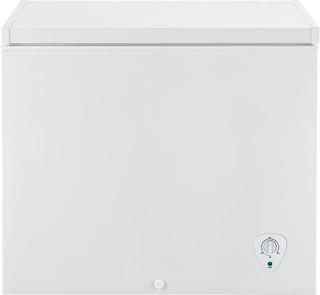
Frigidaire FFFC07M4NW freezer — manufacturer product photo
Photo: FFFC07M4NW. Photo source
Historical record

Frigidaire FFFC07M4NW

Temperature settings

Freezer · US market · 41 owner topics

Frigidaire chest freezers

Guidance for Frigidaire freezers. Check the feature and control descriptions against your model.

Frigidaire chest freezers

Adjust the chest freezer dial in one step

Frigidaire’s knob guidance gives a counterintuitive direction: lower numbers make a freezer warmer and higher numbers colder. It recommends small changes and a full 24 hours for stabilization. That instruction applies to the knob control described by Frigidaire; do not use it on a digital chest freezer without checking that model’s manual.

Use a thermometer to establish the cabinet temperature before touching the dial. A freezer that has just been installed, reconnected after power loss or loaded with room-temperature food can run continuously while cooling. Changing the dial repeatedly during that recovery makes it harder to tell whether the original adjustment worked.

Read the dial direction

For the Frigidaire knob described in its support article, turn toward a lower number to make the freezer warmer and toward a higher number to make it colder. Change the position a small amount, mark the old setting, then wait 24 hours before judging the cabinet. Do not infer that all numeric controls use this direction; digital buttons and model-specific scales require their own manual.

The warmer/cooler direction comes from Frigidaire’s knob article: lower number means warmer, higher number colder. It describes gradual adjustments rather than a fixed “correct” dial position. If the label is missing or the control is electronic, do not infer direction from another freezer’s dial.

Measure instead of judging by compressor time

Place a freezer thermometer where food is stored and compare it with the supported target in the owner guide. Frigidaire’s general freezer guidance recommends 0°F. A long-running compressor alone does not show that the dial is wrong: a recently connected freezer may need up to 24 hours to stabilize, and warm loading, frequent lid opening or a poor gasket seal increases run time.

Frigidaire recommends 0°F as the target for general freezer guidance. Check the temperature with a freezer thermometer instead of relying on the compressor sound or frost alone. Place the thermometer among stored food and allow the full 24-hour stabilization period after an adjustment.

Reduce warm-air entry during recovery

Keep the chest lid closed except when loading or retrieving items. Inspect the gasket contact around the rim and clean dirt from the sealing surface. Frigidaire lists a dirty or poorly fitting gasket and frequent openings among reasons for longer runtime. Do not add hot food; its run-time article says to add no more than 2–3 pounds of unfrozen or room-temperature food at one time.

Warm food increases run time; Frigidaire says not to add more than 2–3 pounds of unfrozen or room-temperature food at once and not to add hot items. Divide a large load into smaller additions and avoid loading beside the temperature sensor if the manual identifies one.

Separate a normal recovery from a fault

If temperature is moving toward the target during the first day, leave the control unchanged and continue monitoring. If the cabinet does not cool after 24 hours, check that the control is not OFF, the plug is seated and the outlet has power; Frigidaire warns against extension cords. Record actual temperature, room conditions, recent outage and load history before requesting service.

Frequent lid openings introduce warm air and cause longer operation. During the 24-hour test, plan retrievals and keep the lid closed. A dirty, cracked or poorly fitted gasket can also leak air; inspect its entire perimeter and clean it with owner-guide-approved care before replacing parts.

If the dial adjustment is followed by more warm loading, the test is no longer comparable; use a stable load and note additions during the wait. A thermometer trend across the full day is more informative than touching packages near the lid.

Specifications & model details

FFFC07M4NW: model-specific checks

Choose the recorded defrost branch

Frigidaire FFFC07M4NW is listed with Manual defrost. Use the manual-defrost branch below: plan cold storage for the food before melting accumulated ice, protect the floor, and use the documented drain arrangement. Keep sharp tools and direct heat away from the liner and refrigerant path.

Use the chest-freezer layout

Frigidaire FFFC07M4NW is recorded as a chest freezer. Check the lid’s full opening arc and whether stored packages hold it up. For moisture or frost, inspect the horizontal rim and lid seal; for moving or defrosting, establish where this unit’s drain discharges before water is released. Keep baskets and heavy packages arranged so the lid closes freely.

Recorded model facts

Model details relevant to this topic

SpecificationRecorded valueEvidence
Defrost typeManual
Archive
California Energy Commission — Refrigerators archive

cec-refrigerators.xlsx; sheet Table; row 9543

Regulatory archive observation; test standard and measurement context follow the original record.

Observed Oct 27, 2026
More background: Temperature settings

Category & symptom guidance

Temperature settings

Start with the food temperature

Use a freezer thermometer to check the temperature rather than relying on a numbered dial or display alone. FoodSafety.gov recommends keeping a freezer at 0°F or below. GE’s measurement guidance describes placing a thermometer between packages near the center for at least three minutes; follow the guidance for your appliance and thermometer. A single quick reading may not reflect the temperature of the stored food.

Keep the door closed while the freezer settles and during measurement. If you are checking after a temperature change, wait for the temperature to stabilize before deciding whether another adjustment is needed. A full load, recently added warm food, frequent opening, and room conditions can affect how quickly the temperature changes. For an outage, use food safety guidance separately from appliance troubleshooting.

Identify the control and freezer type

Find the model number and consult its owner’s manual before changing controls. Numbered settings differ across brands and models, and some controls show only relative cooling rather than degrees. GE explains that its numbered control affects compressor run time and does not correspond to an exact temperature; that explanation applies to GE guidance, not every freezer. Check whether the appliance is chest or upright, and manual-defrost or frost-free.

A manual-defrost freezer may use a simple dial without a digital temperature display. Frost-free models may have electronic controls or an alarm, but the presence and behavior of those features vary. Do not assume a dial position, alarm threshold, test switch, or reset procedure from another freezer applies to yours. Use the model-specific label and instructions to identify what each control actually does.

Make a small, deliberate adjustment

If the measured temperature is warmer than the target, check that the control is on and set according to the manual. Change a numbered control by one step when its instructions call for gradual adjustment, then allow time for the freezer to respond. GE’s older FCM5, FCM7, and FCM9 chest manual advises moving one step at a time and allowing several hours; this timing is an example for those models, not a universal rule.

For the Danby DCF035A6WM, DCF050A6WM, DCF070A6WM, and DCF100A6WM chest family, the manual identifies 1 as warmest, 7 as coldest, 4 as usual, and 0 as off. That scale should not be transferred to other Danby models. Avoid turning a control to maximum as a general fix; use any fast-freeze feature only if fitted and directed by your manual.

Check conditions before adjusting again

After the adjustment has had time to take effect, measure again using the same method and location. If the temperature is at or below 0°F and stable, leave the control in place. If readings vary, keep the door closed and consider whether loading, recently added food, or repeated openings are affecting the result. Don’t keep changing settings based on a brief warm reading immediately after loading.

Check that packages are not blocking a door from closing and that the gasket meets the cabinet around the opening. Use only the installation spacing and ventilation directions in the exact manual; there is no single clearance that applies to all freezers. If your freezer has an alarm, interpret its light, sound, and silence controls only from its own instructions. An alarm signal is not itself a temperature measurement.

Choose the next action from the result

If the measured temperature remains above the food storage target despite correct settings and a closed door, protect food and continue monitoring with a thermometer. During a power outage, keep the door closed and use FoodSafety.gov’s outage guidance to decide whether food can be kept, refrozen, or discarded. The guidance notes that a full freezer can stay cold longer than a half-full one, but actual conditions and exposure matter.

If the control is on, the door closes, and temperature does not recover, consult the model’s troubleshooting section or arrange qualified service. GE’s general troubleshooting article lists owner checks and directs users to repair support; it does not establish a failed component from a symptom. Avoid opening panels or attempting sealed-system work. Record the model, control setting, and thermometer readings to make the next diagnosis more useful.

General background sources

These sources support the shared guide. Exact model specifications and matched family procedures have their own sources above.

  1. products.geappliances.com/appliance/gea-support-search-content?contentId=19480
  2. products.geappliances.com/appliance/gea-support-search-content?contentId=16994
  3. www.foodsafety.gov/keep-food-safe/food-safety-in-disaster-or-emergency
  4. cdnns.danby.com/4973611/DCF035A6WM_DCF050A6WM_DCF070A6WM_DCF100A6WM_A5_EFS_20240125.1006713.pdf

Owner guidance by Specs & Parts, drafted with GPT-6 Luna. Sources and scope.

Sources for FFFC07M4NW

Suggest a correction