Appliance & electronics support
Find your model numberAbout our sources
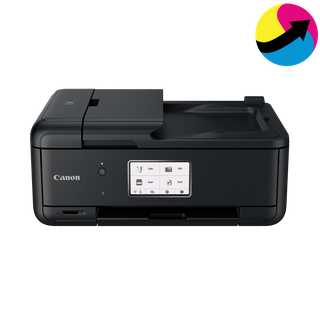
Canon PIXMA TR8620a — manufacturer photo from Canadian listing
Photo: PIXMA TR8620a (Canadian listing). Photo source
Public catalog

Canon K10571

Poor performance

Source model names: TR8620a, TR8622a

Imaging product · US market · 41 owner topics

Canon PIXMA TR8620 / TR8620a series

Covers K10571 and the manufacturer-listed models in this family.

Canon PIXMA TR8620 / TR8620a series

TR8620/TR8620a print defects: read the pattern before spending ink

Canon’s TR8600 guide applies to TR8620, TR8620a, TR8622 and TR8622a. Its print-quality sequence is evidence-led: inspect the output and nozzle-check pattern, correct paper/quality settings and ink condition, then clean only when the pattern shows missing lines or horizontal white streaks. This matters because the TR8600 is a replaceable ink-tank system, not a refillable MegaTank. Repeated deep cleans consume more ink and can hide the original symptom rather than identify whether one color, one cartridge, or the printhead is involved.

Before changing a setting, classify the defect. A whole blank page, a faint single color, streaks across the full page, inaccurate color, or a smear on the back are different observations. Print a nozzle check from the maintenance controls, keep the sheet, and compare its color blocks with Canon’s examples. Also note whether the page is a direct copy or a computer print: copy quality can add platen-glass and original-placement variables. The code mapping in this family is K10525 for TR8620 and K10571 for TR8620a; Canon’s cited manual lists both along with TR8622 variants.

Preserve a baseline sample

Print a normal page that shows the defect, then use the TR8600 maintenance menu to produce a nozzle-check sheet on plain A4/Letter paper loaded in the cassette as the manual directs. Do not start with Deep Cleaning. The baseline separates a clogged-color pattern from incorrect media, driver quality, a source image or a scan/copy issue. Mark which color has gaps and whether the missing lines appear in one pattern area or across the entire sheet. That observation helps distinguish a single ink path from a broader feed or software issue.

Check ink level and cartridge seating

Canon’s TR8600 troubleshooting tells owners to check estimated ink and whether a ink tank is installed correctly, including removing any remaining protective material on a new cartridge. Use the ink-status display and inspect only the user-accessible cartridge area. If a single color is low, replace the specified color with a matching PGI-280 or CLI-281 tank from the TR8600 ink page, then print the pattern again. Do not substitute the PG/CL cartridge codes from TS3700 or TR4700, and do not touch the electrical contacts or printhead nozzles.

Correct paper and print-quality settings before maintenance

Canon places paper and print-quality settings early in the TR8600 diagnostic path. Confirm the selected paper type matches the loaded sheet and that the driver is not set to a mode intended for another media. For a copy, check the original is face down and the platen glass is clean. For a computer print, compare a known simple document with the application file. If the nozzle pattern is complete, a print-quality or source problem is more plausible than a clog, so preserve ink and test the non-maintenance variables first.

Run standard Cleaning once and inspect again

When the nozzle sheet shows missing lines or horizontal white streaks, Canon’s TR8600 menu provides Maintenance > Cleaning. The manual says cleaning takes about one minute and consumes ink; it prints a pattern confirmation afterward. Let it complete without issuing another command, then compare the new sheet with the baseline. If the affected color improves, stop and print a small test page. If nothing changes, do not queue multiple cleaning commands at once; proceed according to the manual’s stated limit.

Reserve Deep Cleaning for the stated condition

Canon directs the owner to Deep Cleaning if standard Cleaning has not resolved the issue after two tries. The deep procedure consumes more ink, takes longer and prints a pattern for review. If a color remains absent, the manual says to check or replace that color’s ink tank; if the problem persists after a second deep clean and rest period, contact Canon service because the printhead may be damaged. Do not repeatedly deep-clean a normal pattern or use Ink Flush instructions from a G-series tank printer.

Use a service report that distinguishes print from copy

If the defect remains, provide Canon service with the family/model name, code-to-name source if needed, the original and post-cleaning nozzle patterns, ink levels, paper type, driver/operating system, and whether the fault appears on copies as well as computer jobs. Include each maintenance action and number of cycles. A completed pattern with normal output on a copy but defects from one application points toward a different path than a missing nozzle block on every source. Stop before opening the printhead assembly; the owner documentation routes unresolved head damage to service.

Specifications & model details

K10571: model-specific checks

Use this model’s marking technology

Canon K10571 is recorded as Ink Jet (IJ). For missing colors or broken lines, start with an internal print-quality/nozzle-check page before choosing the manufacturer’s cleaning level. Check the actual cartridge or tank arrangement before buying ink; a marking-technology label does not specify the refill system.

Check the recorded two-sided capability

Canon K10571 lists automatic duplex output as Yes. Compare the driver’s two-sided option, paper size and media type with the supported paper path. A printer’s output duplex entry does not establish two-sided scanning.

Recorded model facts

Model details relevant to this topic

SpecificationRecorded valueEvidence
Declared print speed15 ipm or mppm
Certification
ENERGY STAR — Printers & imaging

printers.csv; row 413; ENERGY STAR ID 2384216

Certification dataset declaration; check manufacturer installation documents for fit and clearances.

Observed Nov 04, 2026
Automatic duplex outputYes
Certification
ENERGY STAR — Printers & imaging

printers.csv; row 413; ENERGY STAR ID 2384216

Certification dataset declaration; check manufacturer installation documents for fit and clearances.

Observed Nov 04, 2026
Color capabilityColor
Certification
ENERGY STAR — Printers & imaging

printers.csv; row 413; ENERGY STAR ID 2384216

Certification dataset declaration; check manufacturer installation documents for fit and clearances.

Observed Nov 04, 2026
Default sleep delay12 min
Certification
ENERGY STAR — Printers & imaging

printers.csv; row 413; ENERGY STAR ID 2384216

Certification dataset declaration; check manufacturer installation documents for fit and clearances.

Observed Nov 04, 2026
Network capabilityYes
Manufacturer
Canon TR8600 series — Network communication

Cannot Find Printer on Network: Wi-Fi and Wired LAN sections; TR8600 manual cover explicitly names TR8620/TR8620a/TR8622/TR8622a.

Canon TR8600 manual names the retail models associated with K10525/K10571 in the ENERGY STAR records. This establishes network capability; wireless and wired LAN cannot be used at the same time. Reviewed against the original Canon manual.

Observed Oct 27, 2026
Page format classStandard
Certification
ENERGY STAR — Printers & imaging

printers.csv; row 413; ENERGY STAR ID 2384216

Certification dataset declaration; check manufacturer installation documents for fit and clearances.

Observed Nov 04, 2026
Marking technologyInk Jet (IJ)
Certification
ENERGY STAR — Printers & imaging

printers.csv; row 413; ENERGY STAR ID 2384216

Certification dataset declaration; check manufacturer installation documents for fit and clearances.

Observed Nov 04, 2026
Product typeMultifunction Devices (MFD)
Certification
ENERGY STAR — Printers & imaging

printers.csv; row 413; ENERGY STAR ID 2384216

Certification dataset declaration; check manufacturer installation documents for fit and clearances.

Observed Nov 04, 2026
More background: Poor performance

Category & symptom guidance

Poor performance

Use the printer’s own quality pattern

Print a manufacturer-provided quality, nozzle, or configuration page from the control panel. That test removes the computer application and driver from the print path. Keep the page and note whether defects are missing lines, banding, streaks, repeated spots, faded areas, or incorrect alignment. These patterns point to different checks and should not all be described as “bad print quality.”

For an inkjet, use the nozzle-check pattern specified for the model. For a laser unit, compare a configuration or quality sheet with the manufacturer’s example for that product family.

Check paper, media setting, and tray

Confirm paper is clean, dry, flat, and supported by the selected tray. Match media type and size in the printer and driver. Photo paper, labels, and envelopes may require a separate path and setting. A mismatch can produce smears, wrong color, poor adhesion, or jams even when the print engine is working.

Do not print on damp or curled paper. If one tray produces defects and another does not, note that result and inspect guides and rollers only as the manual allows.

Inkjet output needs its own diagnostic sequence

If an inkjet’s nozzle pattern is incomplete, follow the exact manual’s cleaning sequence and wait interval. Compare each new pattern with the prior one. Cleaning uses ink and repeated cycles can fill a maintenance box or reduce supply life. Do not exceed the manufacturer’s limit or manually wipe the printhead unless instructed. Check ink level and confirm any tank vent or cartridge installation steps are complete.

If the pattern is complete but a document looks wrong, inspect application color settings, paper profile, and driver mode instead of running more cleaning cycles.

Laser marks and fading need a different check

For laser output, note whether spots repeat at regular intervals, whether one color or all colors are affected, and whether the page is faded or smudged. Use the model’s guide to identify which toner, drum, belt, or fuser check is appropriate. Do not touch imaging surfaces or open the hot fuser section. Some units separate toner from the drum; replace only the component the manual or service diagnosis identifies.

If the printer’s own pattern is normal but one file is poor, examine the source image, font embedding, and driver settings.

Preserve the first bad test page

Keep the first printer-generated page that shows the defect. Note date, paper type, tray, quality mode, supply state, and whether the pattern came from the panel or computer. For a repeating mark, describe spacing without touching internal components. For an inkjet, keep the nozzle pattern; for laser, save the quality page. Use the model’s official guide before deciding which part may be responsible.

Check alignment only when the test calls for it

If text is doubled, skewed, or color edges do not align, the model may offer an alignment procedure. Use it only after the relevant test page indicates that step and use plain paper when required. Alignment is different from nozzle cleaning or replacing toner. Keep the alignment sheet and resulting status so a later support request can show whether the adjustment changed output.

General background sources

These sources support the shared guide. Exact model specifications and matched family procedures have their own sources above.

  1. support.hp.com/us-en/document/ish_4513541-4038068-16
  2. files.support.epson.com/docid/cpd6/cpd64046/source/printers/source/ink_functions/tasks/et3930_3950_l6370/checking_nozzles_lcd_et3930_3950_l6370.html

Owner guidance by Specs & Parts, drafted with GPT-6 Luna. Sources and scope.

Sources for K10571

Suggest a correction